


DIY Mushrooms in Forests Light
DIY Mushrooms in Forests Light
9900 in stock
Regular price
$35.00 USD
Regular price
$63.99 USD
Sale price
$35.00 USD
Quantity
Couldn't load pickup availability
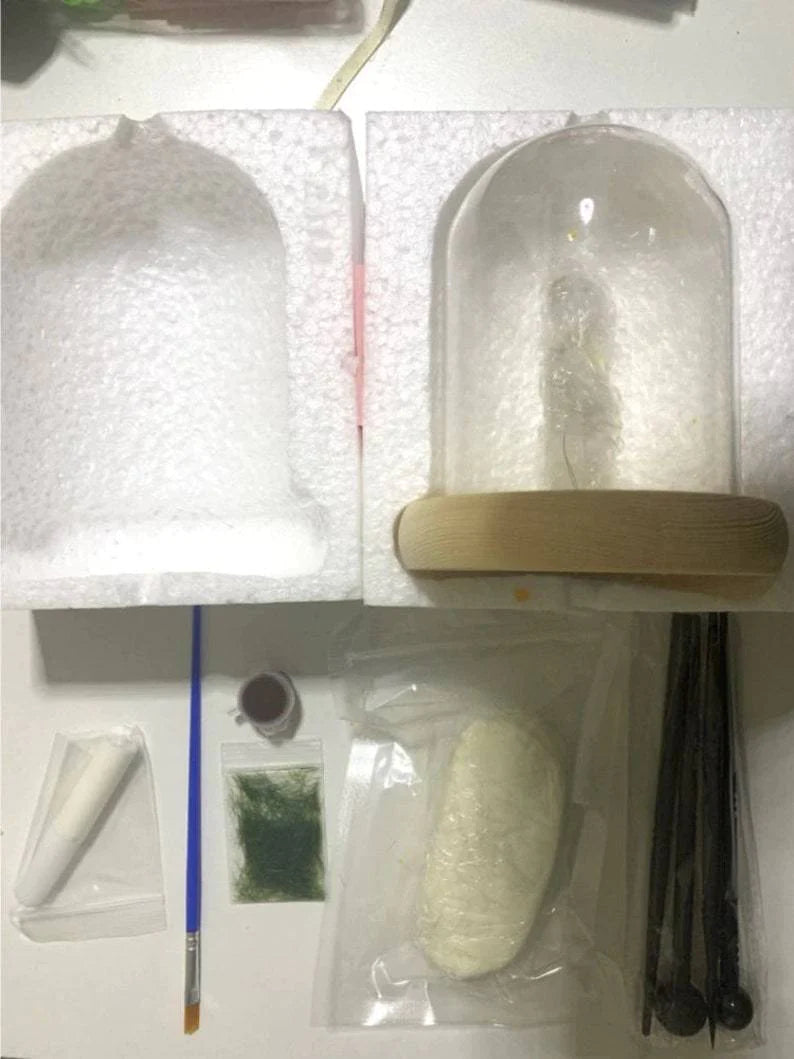
Whatever your age, there's something so fascinating about mushrooms. They are always occur in fairy tales, full of strange and enchanting colors. Turn it into a light, and then entrance to a fantasy journey that it will only reveal the truth after you fall asleep. You can use it as a decoration in your living room, bedroom, or bedside. This DIY Mushrooms in Forests Light features LED lights imbedded in it, and thus the warm white light illuminates the entire dome.

Something to kill a little time and be creative on you stay home days.
Specs:
- Material: Glass + Wood
- Size: 12x9cm/4.72x3.54in
- 3 AAA Batteries ( Not Included )
- DIY material kit
Production steps:
Step 1: Twist the filament out of the approximate shape and height of the mushroom. (Probably made 6-7 different mushrooms, the remaining filaments can be spread on the bottom)
Note: The distance between USB filament lamps is 5cm. The manufacturing process is the same as that of the battery, except that there will be lights on the USB-style mushroom pole, which does not affect the manufacturing. The height of the mushrooms can be set according to your preference.
Step 2: Arrange the distance and height of the mushrooms, and fix the bottom of the filament with hot melt glue.
Step 3: Cover the bottom with clay, the high point of the clay in the middle makes people feel like a mound, making a curved lawn. And knead it into similar-sized stems.
Note: 1. The clay needs to be encapsulated.
Note: 2. The stems can be made into thick and thin mushroom stems according to your preference. Mushroom stems need to be rubbed evenly by hand. In the process of making mushroom stems, there should be no traces of broken wires, otherwise the mushroom stems will crack when the clay dries.
Step 4: Use clay to assist paving tools to make bacteria caps, and fix the rods and caps with latex.
Step 5: Apply a layer of brown paint on the bottom and let it dry after painting.
Step 6: When the paint is dry, apply latex evenly.
Step 7: Sprinkle grass powder
Step 8: Leave it for a day or two, wait until the clay is completely dry, cover with a glass cover, and finish
Reminder: A little excess grass may fall off during the transportation of the finished mushroom lamp. We will give a small brush to each finished product. You only need to use the small brush to clean the excess grass.
If you don't understand something during the manufacturing process, you can contact us. We will answer you as soon as possible.
Looking forward to your production and sharing with us.


Shipping Policy
The time for order delivery is divided into two parts:
Processing time: Order verification, quality check, and packaging. All orders are usually sent to our manufacturer for dispatch within 3-6 days after the order is placed and payment is received.
Shipping time: This refers to the time it takes for items to be shipped from our warehouse to the destination.
USA Shipping time: 8-14 days.
Canada Shipping time: 8-14 days.
Australia & New Zealand Shipping time: 8-14 days.
U.K & EUROPE Shipping times: 8-14 days.
Others Countries Shipping times: 8-14 days.
The items in our collections can come from different suppliers and in some cases and will be shipped in separate packages at no additional cost to you. Please don't worry! Let us know if there is still something missing after waiting patiently a bit longer and we will look into it.
We are working hard to get all orders out as soon as possible. We know it may be frustrating to wait longer than expected for your order, but the one thing we don’t want to do is a sacrifice is the quality of our products. Thanks for understanding.
Return and refund policy
Thank you for shopping at Blackbrdstore! Please review our updated return policy below:
1. Eligible Returns:
We accept returns for clothing items only.
- Clothing items must be unworn, unwashed, and in their original condition with tags attached.
- Returns must be initiated within 15 days of delivery.
2. Non-Returnable Items:
We do not accept returns for home decor items or kitchen items due to their fragile nature and specific packaging requirements.
3. Return Process for Clothing Items:
- Contact our customer service team at info@blackbrdstore.com to initiate a return for clothing items.
- Restocking fee: 2%
- Provide your order number and details about the clothing items you wish to return.
- We will provide you with return instructions, including the address to ship your return. Return shipping costs are the responsibility of the customer.
- We recommend using a trackable shipping service or purchasing shipping insurance. We cannot guarantee that we will receive your returned item.
4. Refund Process for Clothing Items:
- Once your return is received and inspected, we will notify you of the approval or rejection of your refund.
- If approved, your refund will be processed and credited to your original method of payment within 5-10 days.
5. Damaged or Defective Clothing Items:
If you receive a damaged or defective clothing item, please contact us immediately for assistance.
6. Exchanges:
We do not offer exchanges at this time for any items. If you need a different item, size, or color, please place a new order for the desired item.
7. Contact Us:
If you have any questions or need assistance, please reach out to our customer service team. We're here to help!
Thank you for understanding our return policy. We appreciate your business and hope you enjoy your shopping experience with us.
We start working on your order as soon as we get it, so we are unable to make any changes or modifications to an order after it has been placed and confirmed.
What is your return policy?
We offer returns for any product that is defective or damaged during shipping. Just let us know and we will provide a return address and a replacement.
Our Returns Policy time frame is 13 days from when an order arrives at your address.
Customers will be responsible for paying return shipping costs.
Items should be returned in the same condition in which they were received, and all items should be included in the original package.
If the returned item is used, damaged, or missing any parts, or is damaged during return shipping because it wasn't packaged correctly, we might provide a partial refund to account for the loss in the item's value.
Why is my order shipping in multiple packages?
To get your items to you ASAP, we sometimes need to ship different items from different locations like our multiple distribution centers.
MY PACKAGE IS MISSING, WHAT SHOULD I DO?
If you have not received your order within the timeframe established for U.S. shipping please check with your local delivery system to ensure the package was not mistakenly placed nearby (at a neighbor's house for example).
In the case that the product is not delivered, just shoot us an email and we'll check on its status for you!
Do you ship internationally?
Yes, we ship to over 100 countries AND FOR FREE✈❤
Why is my item different than the photos?
Many of our products are handmade to order, one piece at a time. It's quite difficult if not impossible to make identical items. Our artisans are attentive masters of their respective crafts who make every effort is made to create only the best. Any blemishes or varying details make each handmade piece charming and unique. The pictures may not be identical to the product you receive as there may be differences in computer monitor settings.
When Will You Ship My Order Items?
Usually, we ship out most of orders in 4-6 business day time period except holidays. We dont ship during the weekend. You receive an shipment information email with tracking no soon after item is shipped from us. In case you don’t receive email you must check it into spam folder.
I Sign Up On Website But Don’t Find Order In My Account?
Did you sign up with the same email account which is associated with your PayPal account? If yes, then you will find your order in your account. If the transaction email id is different from sign-up email account then you can’t see your order into your account as the system automatically creates an account of transaction email id. Hence, your PayPal email id must be same as sign-up email id.
What Should I Do If Item Is Found Damaged?
First of all, you must notify us immediately via email at info@blackbrdstore.com the same day after receiving the order with attached photos of broken/damaged item so that we will look into the matter.
What is the material of the self-adhesive mural wallpaper ?
There are 2 materials available to choose from (Waterproof Canvas / PVC Material). It is self-adhesive mural wallpaper. The bottom has glue, just peel and stick. Easy to install on the wall. If we haven't got the material within 24 hours, we will produce the default material " Waterproof Canvas ".
I need 1 set of self-adhesive mural wallpaper, the size is 2.8m width and 2.6m height. How to order it?
Area = width x height. Square meters = Order Quantity
Area = 2.8m x 2.6m= 7.28m2, So you should order 8 square meters. Please choose quantity 8 in the order.
Customer satisfaction is VERY important to us. We know how it feels to be a customer and we'll do everything in our power to make sure everything goes smoothly. Just send us a message and we'll figure it out!
Thank you for your patience and understanding!
Blackbrd Store.